After learning how to weave a spikelet and learning this technique, you will no longer worry about what to put on your head when you go to work, workout or date. It is universal hairstyle, allowing to complete any look: elegant evening, strict business or practical sports. Just a few touches can transform the classic weaving beyond recognition.
Content


Varieties of classic hairstyles
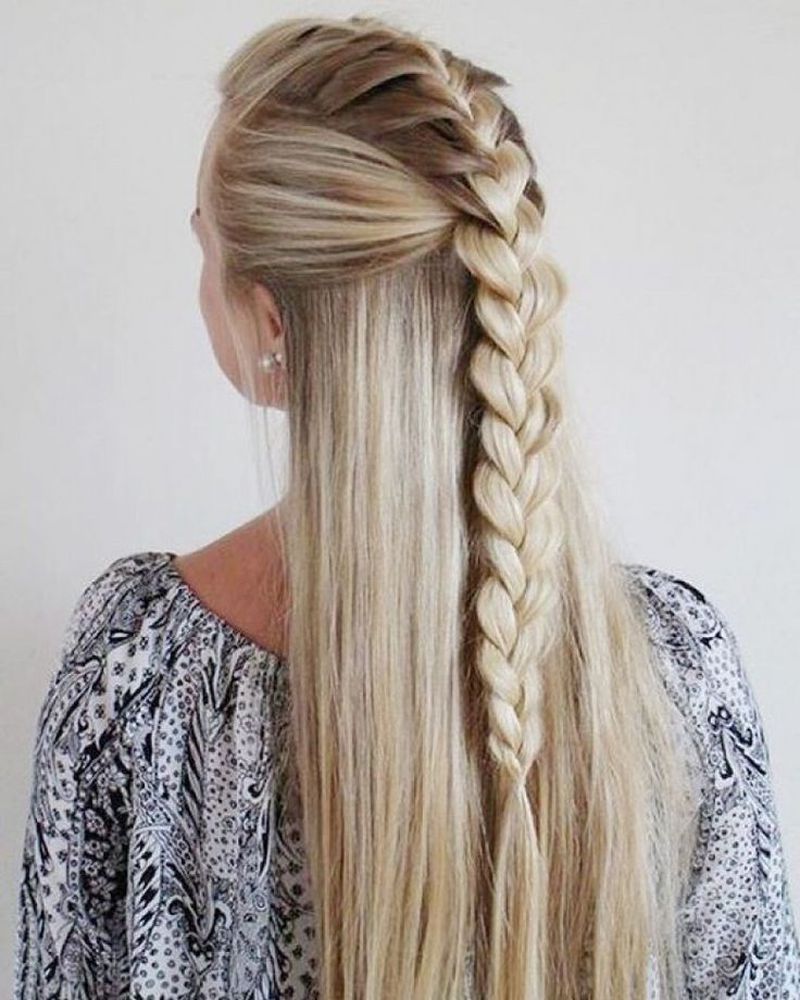
Spikelet, Whelp, Fishtail, French scythe - so called intricate weaving, distinguished by its sophistication and beauty, as well as practicality and simplicity in creation. Suitable for girls, girls and women of all ages and social statuses. And if some 10-20 years ago a spikelet was considered a distinctive feature of schoolgirls and students of higher educational institutions, now it successfully complements romantic, business and even sports images.
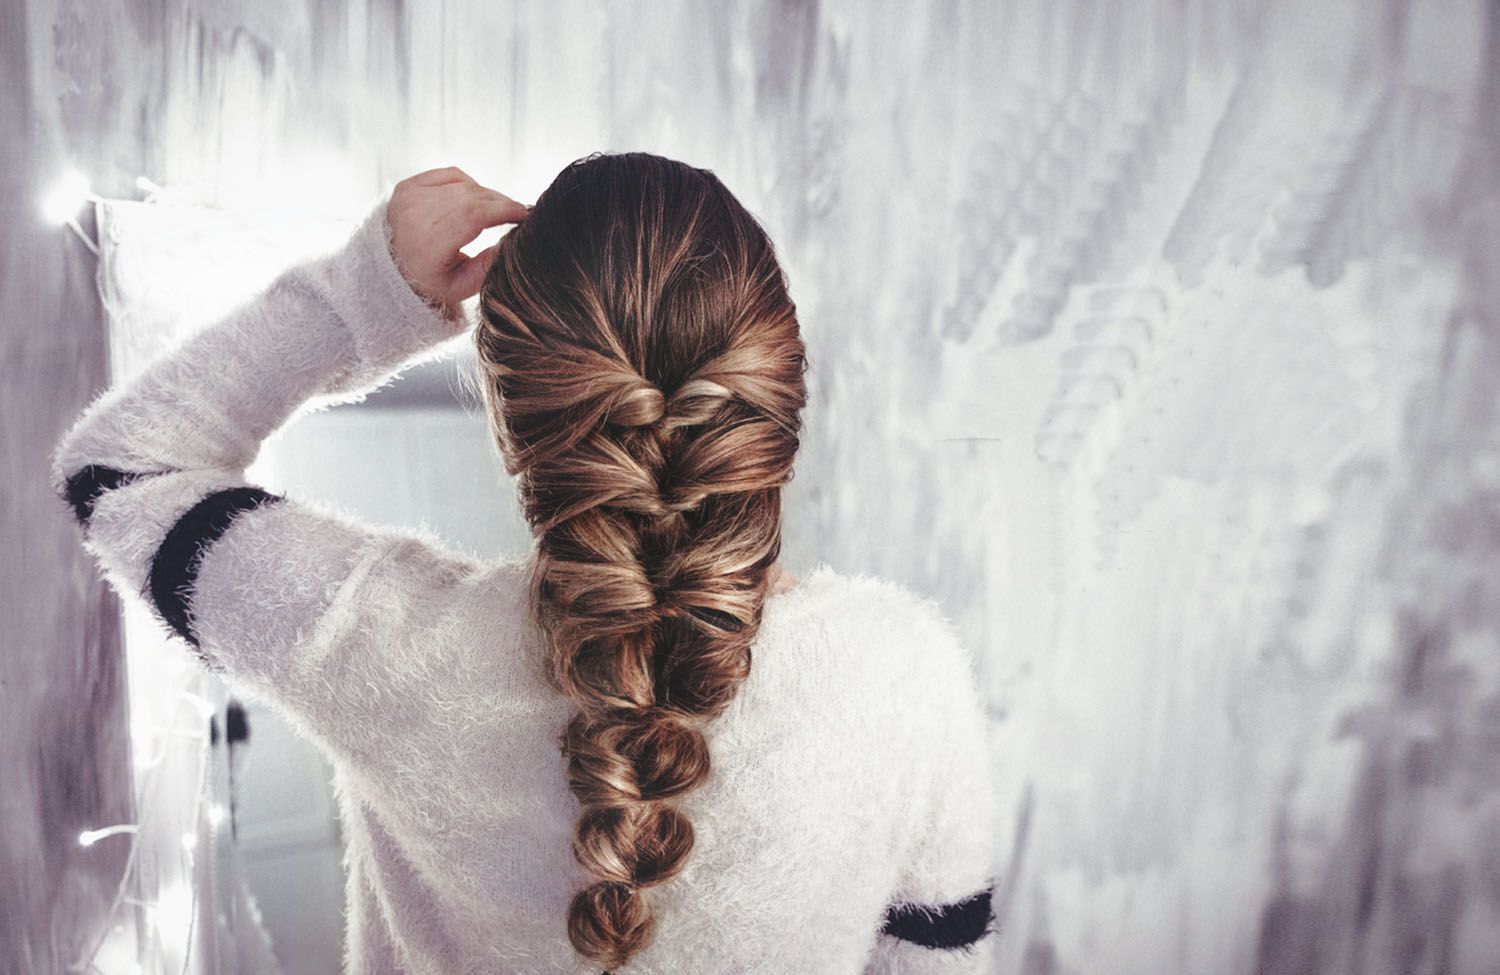
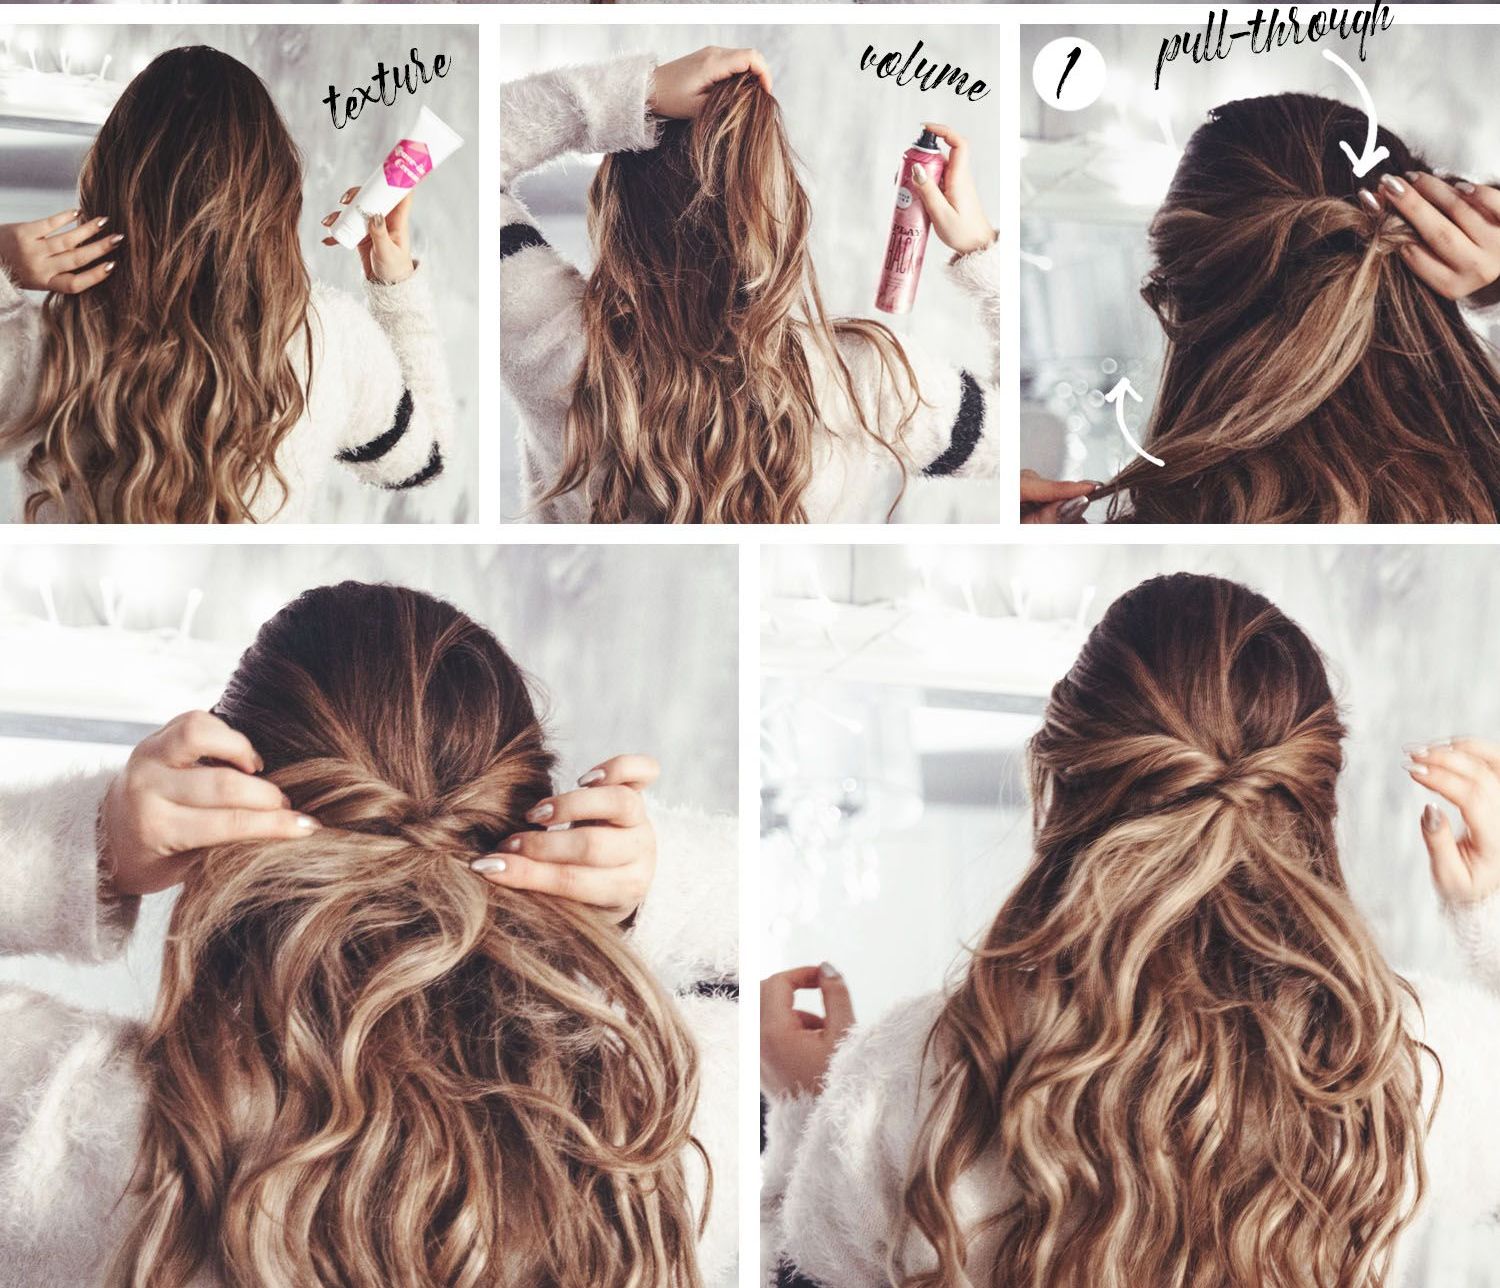
The spikelet is back in fashion, but in a slightly modified presentation - with deliberately stretched strands and light notes of carelessness.
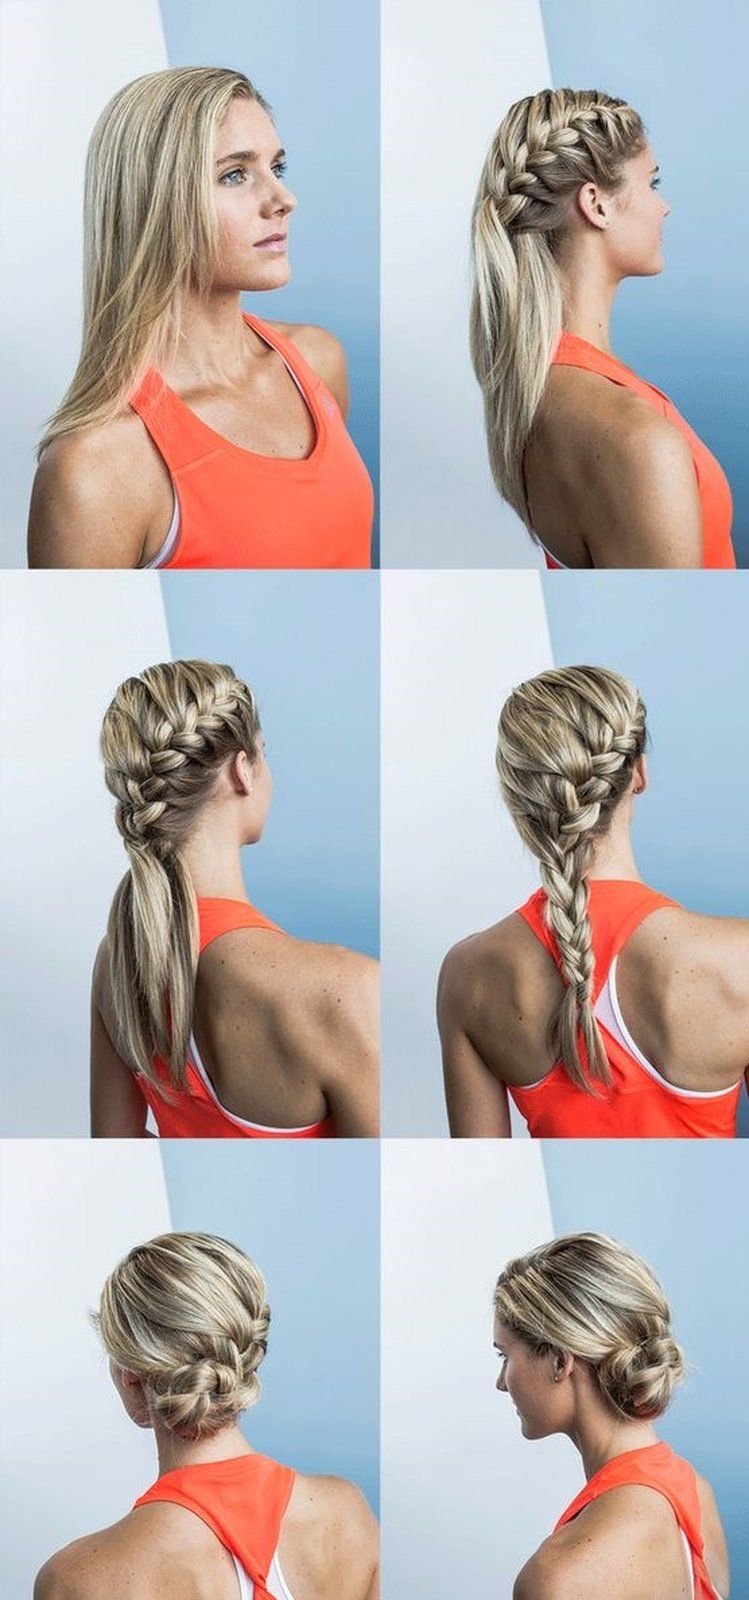
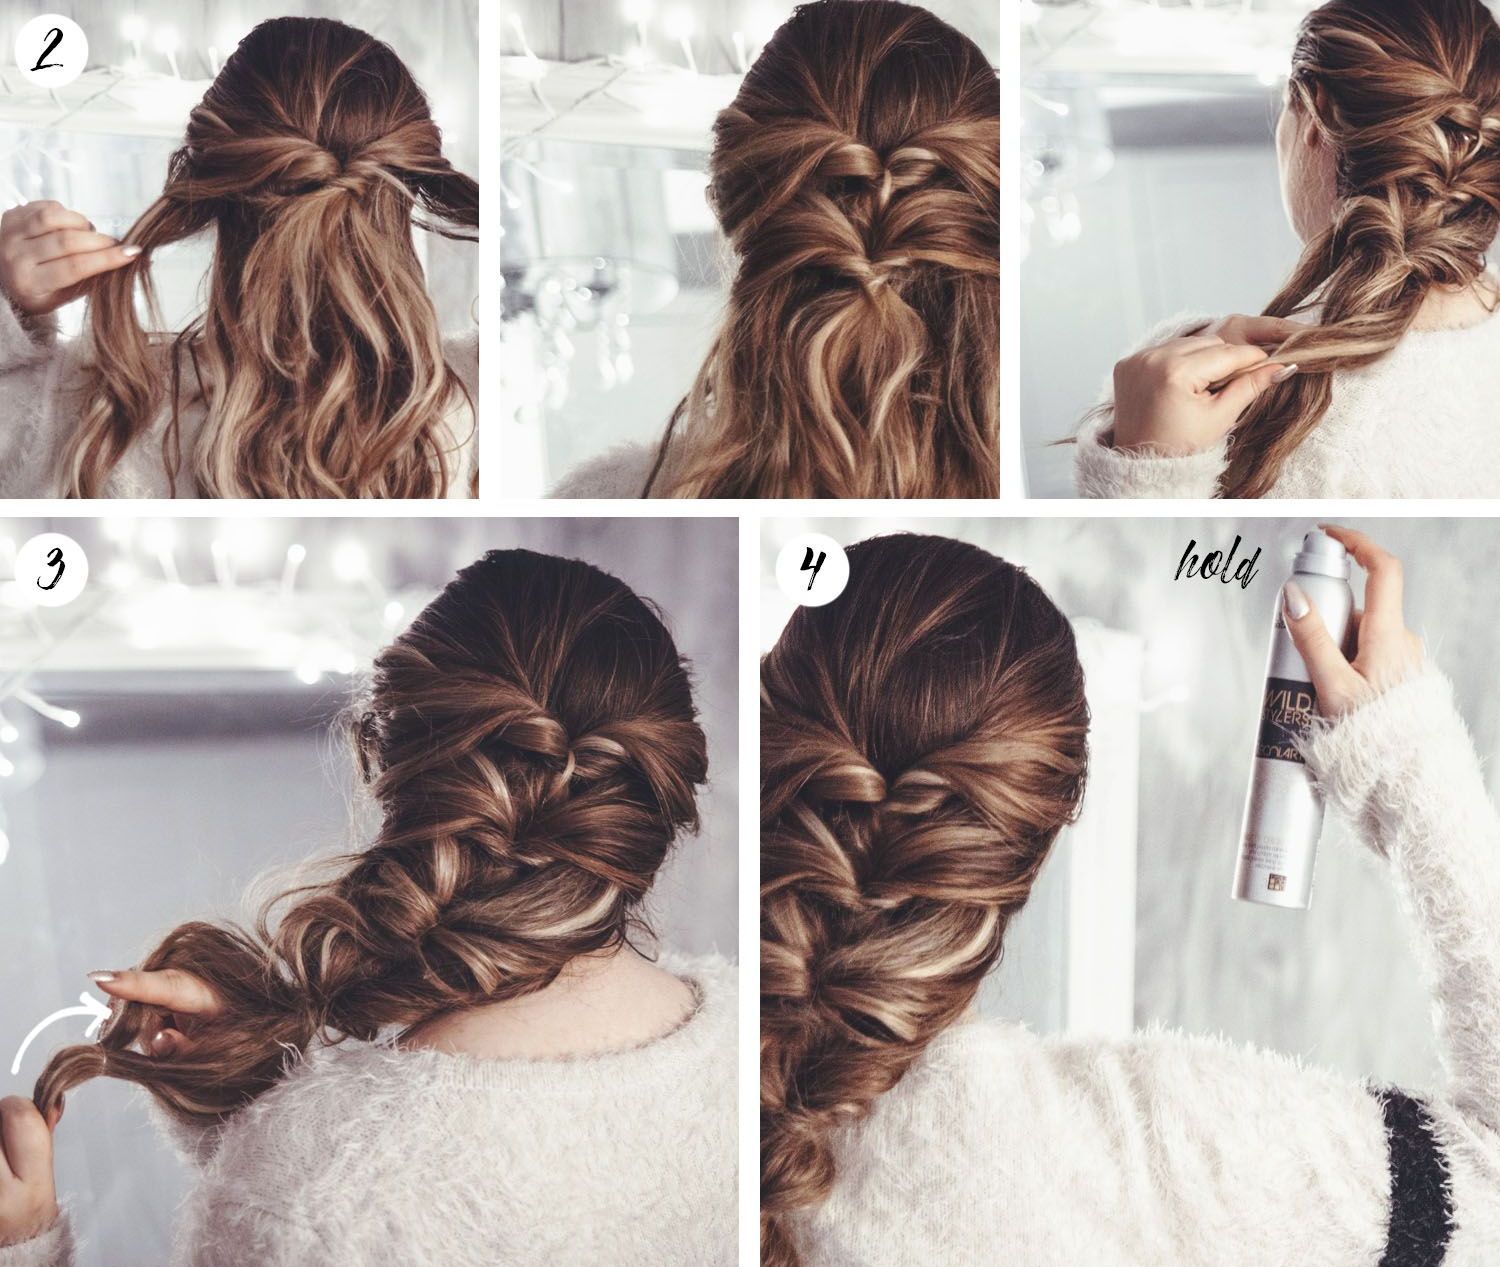
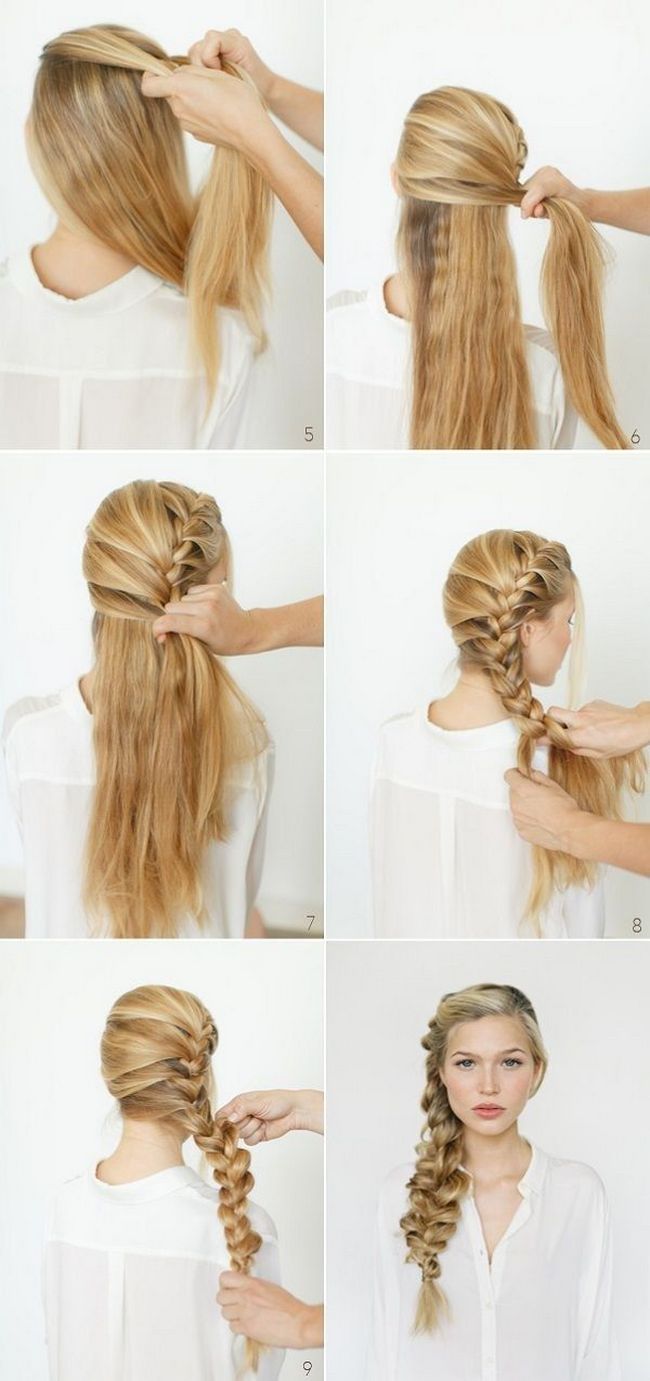
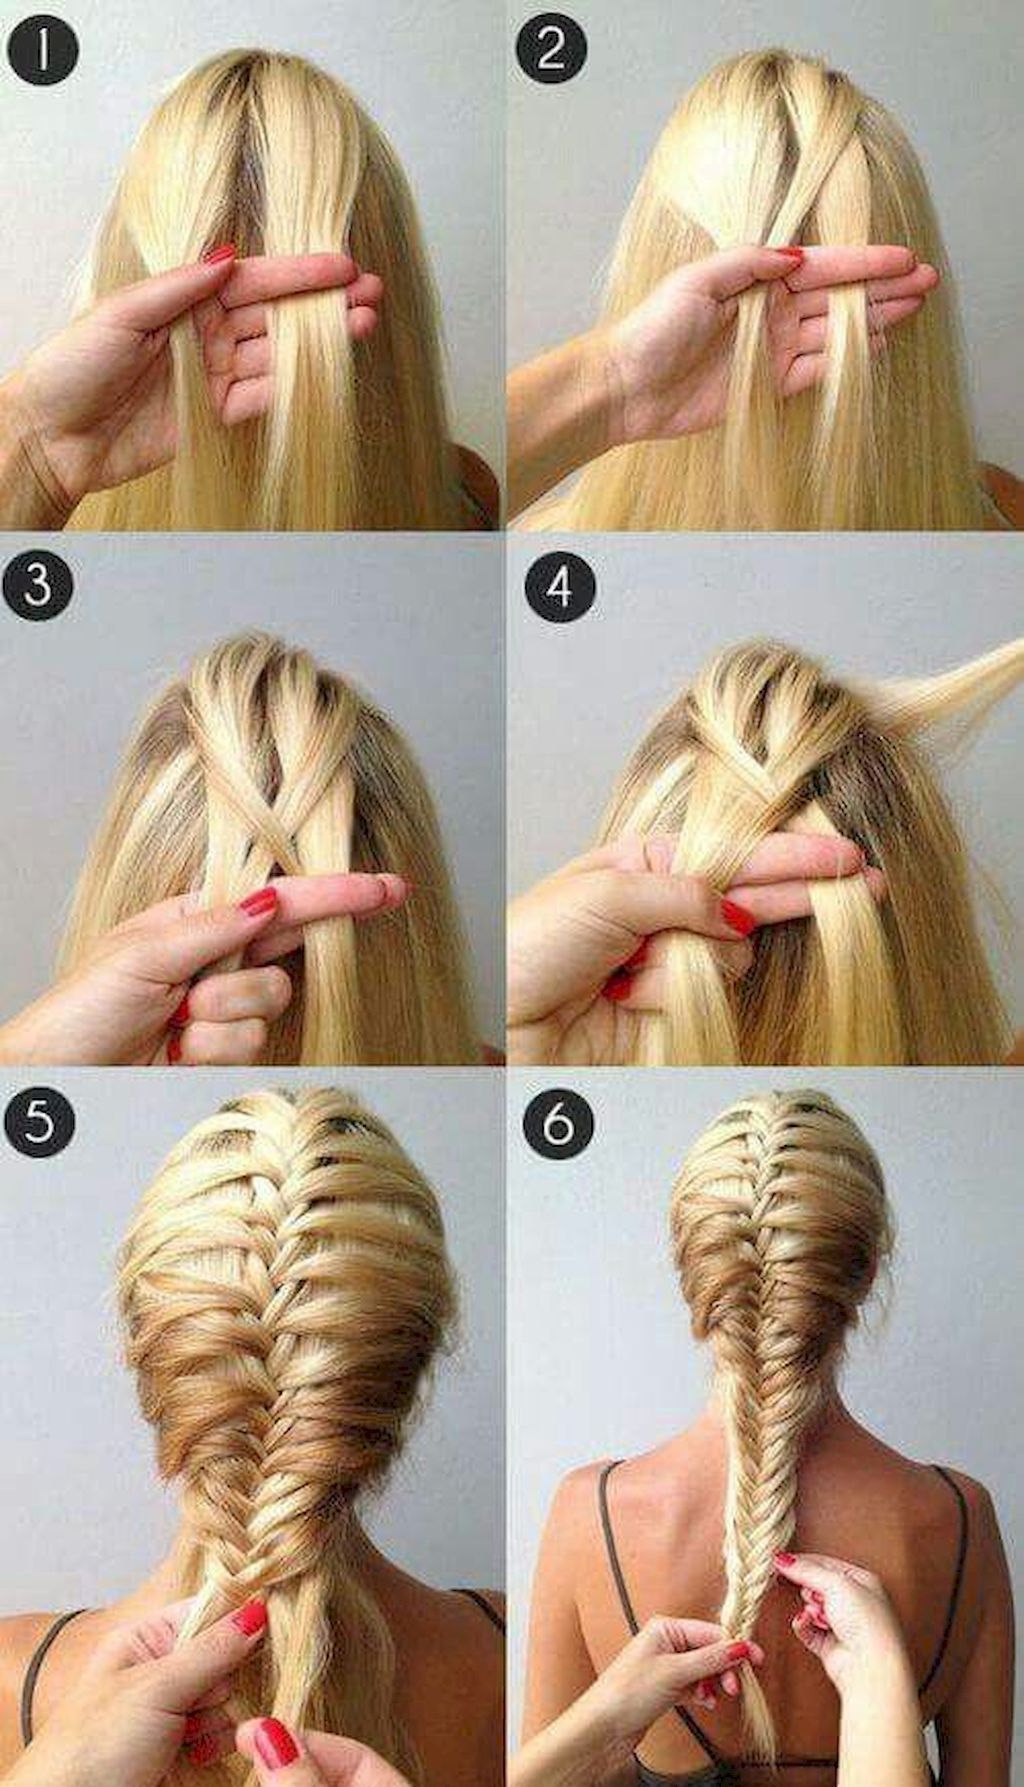
The standard weaving method involves grabbing the strands from the very top of the head and then alternately attaching the rest of the hair to them until the very end. At the end, loosely hanging curls are braided into a standard Russian braid and fastened with an elastic band or hair clip.
There are at least 10 design options, and this is not counting those cases when loose curls, bangs or, for example, a ponytail are decorated with locks using the French weave technique.


The final result depends on several factors:
- from the shape of the parting;
- from the thickness of the strand;
- from the number of strands (from three or more);
- from the direction and sequence of weaving.
Depending on the skill and imagination of the master, there are the following types of hairstyles:
- classic spikelet (looks beautiful as one in the center and two on the sides);

- a French braid on one side, the ends of which can be left free and twisted, or braided and hidden under a hair clip;

- version inside out (it differs from the classic one by the fact that the strands are woven inside);

- "Wreath" around the head. Such a proposal will effectively highlight the beauty at an evening social event, during a romantic date or attending a theater;

- construction of 4 or more strands. A very complex hairstyle looks charming on the hair below the waist.

Advice!For owners of short hair, weaving in the Boho style is the best fit. Make one or more braids, full length or up to half - in any case, the result will be seductive. In the coming year, floral accessories in the form of twigs and flowers have become fashionable. Decorate the fancy weave with a hairpin resembling a branch of rowan, lilac, or even a living flower.
Tips for Beginners
The main difficulty in weaving is that you have to work almost by touch, because without a pair of mirrors or a webcam from behind, the result cannot be seen in full.Tense handles quickly get tired by weight, so do not rush to get unique beauty the first time. To get started, watch the training videos that explain the correct position of the hands during the weaving process and other tricks from experienced craftswomen.


Advice! The work will take 10-20 minutes, it depends on the length and thickness of the hair. However, at first, the hairstyle can disintegrate, and untidy knots and bumps can ruin the mood. Do not be discouraged if you do not get a high-quality result the first time. After 2-3 attempts, you will determine the optimal position of the hands and the degree of hair tension and learn how to pick it up without much effort.
And a few of the following recommendations will help to greatly simplify the process of weaving curls for beginners:
- to achieve the highest quality result, thoroughly wash and comb your hair;
- so that beauty does not disintegrate as long as possible, first apply a little foam to the hair. If styling products are not at hand - leave the curls moist, so the strands fall more evenly, do not tangle, do not puff and do not electrify, and the spikelet itself retains its original appearance longer;
- a spikelet braid can be an excellent substitute for curlers if you braid it immediately after washing your hair for the night. The size of the curls depends on the thickness of the strands. If you want fluffy hair, braid 2 or 3 French braids, and in the morning unravel them and do not comb them, just gently disassemble them with your fingers and lay them in the required direction;
- when you gain experience - give free rein to experiments. Try weaving ribbons, creating braided roses, and more.


Detailed step-by-step instructions
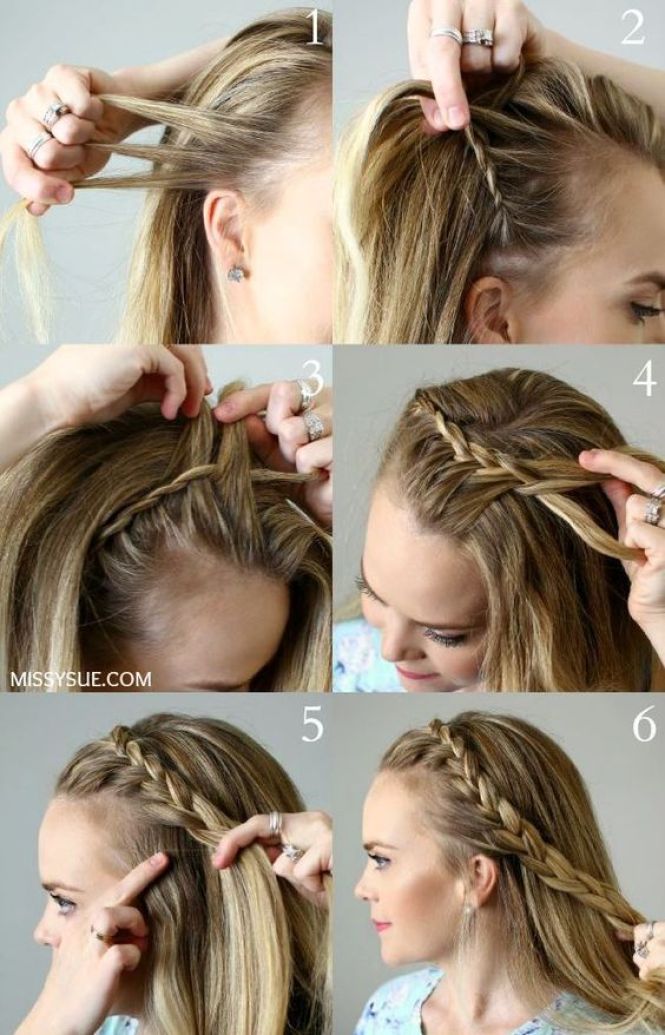
Choose a well-lit area with two mirrors facing each other. It is also worth stocking up with a flat comb with frequent teeth and a long thin handle, small silicone rubber bands, an elastic band or hair clip to secure the result, a couple of hairpins to smooth out stray hairs and a styling tool for fixing.


And now let's start considering the basic weaving pattern, having mastered which you can proceed to the study of more complicated techniques.
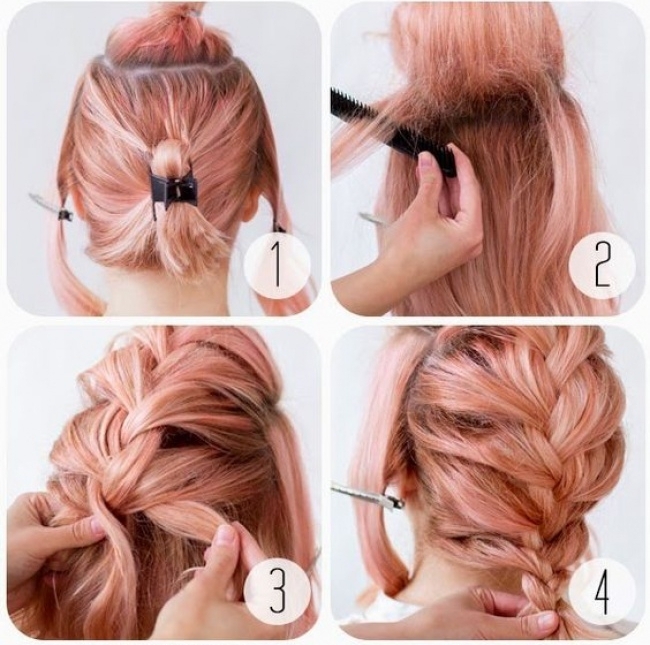
- First, wet your hair just a little. If you have foam or mousse, use them. Our main task is to make the strands obedient so that they do not crumble during work. Gather a lock of hair on the crown of your head and tie it with a silicone rubber band, which you will remove at the end by cutting with nail scissors. This will greatly simplify getting started, because you need 3 strands, and two hands.
- Leaving a loose strand in the center, pick up 2 more on the sides of it.
- Flip the left side to the right side, and move the central one so that it passes under the left.
- Swipe the right one to the right, but so that it goes over the top of the left.
- Now over the right strand, which is currently on the left side, lay the central one, but pick up an additional bundle for it.
- A reliable base of the spikelet has already formed on the head.
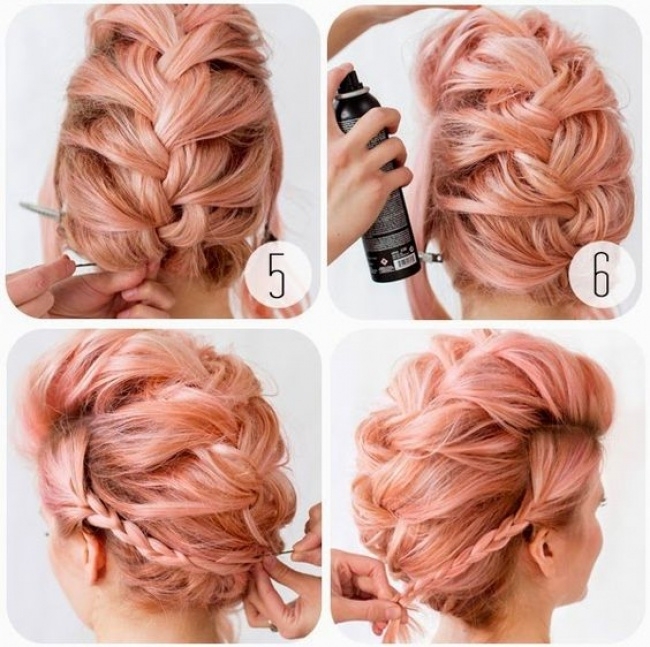
- Continue steps 3-5 until you are near the beginning of the neck. Free curls should no longer remain on the head.Hair from a spikelet can be pulled off immediately with an elastic band, or you can simply braid it into a standard braid.


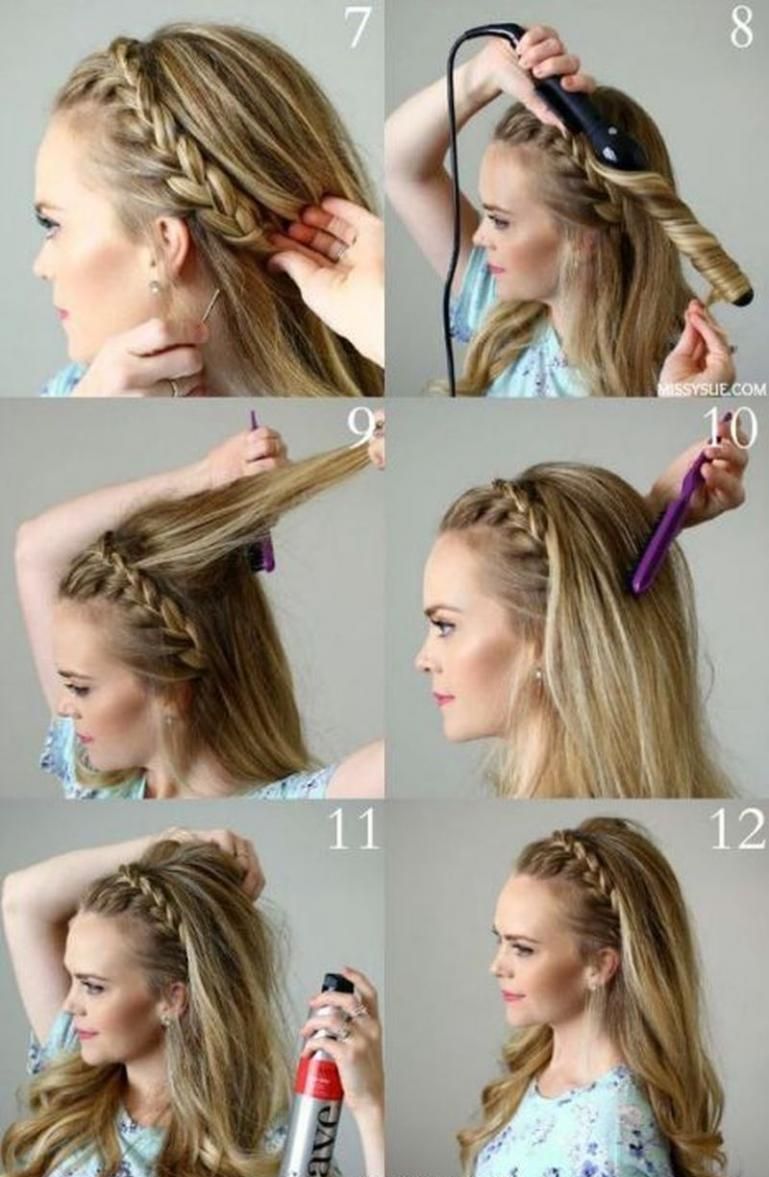
Advice!The weaving technology we are considering is suitable for straight strands. To facilitate the process on wavy and curly strands, smooth them slightly with an iron, so the curls will become more obedient and pliable.


That's all, the work is complete. Apply a little polish to smooth out frizzy hair. Stretch the weaves a little more for an airy look. These instructions are the foundation from which you can move on to creating something more mesmerizing.


A pair of dragons is a great option for both a child and an adult fashionista
If earlier caring mothers made two spikelets exclusively for schoolgirl daughters, now this option is also suitable for older young ladies to go to work or to a fitness club. To add some flavor to this pattern, you can slightly stretch the braided strands. The created volume and airiness look spectacular; such a creation does not in any way resemble children's pigtails.


Advice! For publication, 2 French braids are well suited, gathered at the bottom in a bundle, which can be decorated with decorative elements. This hairstyle is in harmony with a Greek dress or any other chiffon floor-length evening dress.
The process takes place in the same order as when creating one classic spikelet. The only difference is that at the very beginning, the hair is divided into two equal parts with a parting. In this case, one, the working part of the curls is left free, and the second is fastened so as not to interfere.
In order to braid 2 spikelet pigtails, a child's mother does not need a lot of tweaks. It is enough to follow the procedure described above, the tight weave will easily withstand a busy day of an active schoolgirl. However, there are times when you want to create something fascinating and unusual.


If you managed to "fill your hand" in the classical technique, we suggest trying to create a circular pigtail-rim:
- start from the area behind the ear to hide the base of the braid;
- separate a small lock with a thin comb near the ear, divide it into three parts;
- start weaving a Russian braid, a few crossings are enough;
then fold two curls together; - alternately add additional strands to the working strands from the sides.
- Take a thin curl on the right side and lay it on the left strand;
- from the left area, transfer to the right;
- repeat these movements until the next ear, until you run out of free hairs;
- pick up curls only from the outside of the rim;
- in the end, braid a regular braid and fold it around the head, then fix it with invisible ones.
- You can decorate your creation with beautiful hairpins or bows.
Technique vice versa or inside out: the subtleties of the process
In general, the reverse spikelet is woven in the same way as the usual one, its only difference is that the strands fall under the bottom, as a result, the eye is pleased with a more voluminous and lush weaving. This is a real salvation for those with thin hair.


You are already familiar with the work progress:
- first, separate the wide strand on the back of the head, without capturing the temporal zone, divide it into 3 equal parts;
- lay the right bundle under the central one, and move the opposite one to the center;
- then move the left one under the right one, so it will come out to the central part;
- continuing the machinations, start picking up the hairs from the sides;
- weave, each time picking up additional curls, until you get to the beginning of the neck;
- then braid the braid to the end, gather it into a beautiful knot or tie the remaining curls into a ponytail.


Advice!The purl dragon looks most beautifully slightly stretched.Therefore, straighten the created braid by pulling its links to the sides.

Original options
Fashion does not stand still, on the contrary, it tirelessly offers new directions. That is why this year it is again fashionable to weave bright ribbons into braids. So a bright piece of silk fabric will not only make the girl more romantic and airy, the use of a ribbon has other advantages:
- it prolongs the life of the hairstyle, so you can create something mesmerizing in the evening and go to bed, while nothing will bloom the next morning;
- even a beginner can cope with its weaving, it is completely easy;
- its use cannot be overemphasized in the winter, when most of the creations fall apart under the hat. The tape will keep your spikelet intact.


However, remember that the harmony of the result depends entirely on the material from which the ribbon is made. Do not rush to purchase the most common offer of stores - a dense tape with a metal frame. She is able to cause considerable discomfort to the girl.
Give preference to products made from natural fabrics. Before the first use, it is advisable to wash, because a bright ribbon can shed and stain the hair. In addition, if colored ribbons are used in the created creation, they can color each other.


As for the width, a 1.5-2 cm fabric would be the best option. When choosing a length, start from the length of the curls themselves - the tape should be 5-6 centimeters longer.


Having mastered the proposed techniques, do not be afraid to experiment, because there are still many unconsidered weaving options that can strike those around you with extraordinary beauty.
More ideas and techniques